Fair Oak Farms

Fairoaks

Yesterday, Todd and I had to drive to Chicago and then back home, a six hour total trip. On the way back, we stopped at Fair Oak Farms to stretch our legs and eat a scoop of ice cream. If you have never been to Fair Oak Farms, you have missed a wonderful facility to visit, a place which offers something interesting for everyone.

The first time we visited the farm, it had far less to see, but was fun, none-the-less. We took a tour of a local cattle farm, watched the milking operations, and had ice cream at the gas station. A couple of years later, they had a birthing barn where we could sit and watch a cow give birth approximately every 30 minutes, a snack building where we could watch cheese and ice cream being made, as well as buy and eat fresh cheeses, sandwiches, and ice cream. A couple of years ago, they opened a beautiful restaurant, which we have enjoyed several times, since. We also were able to tour a pig farm and see baby pigs and their mommies in many stages from newly born to weaned. Other sites at Fair Oak Farms included a display garden, a rock climbing wall, and a playground.

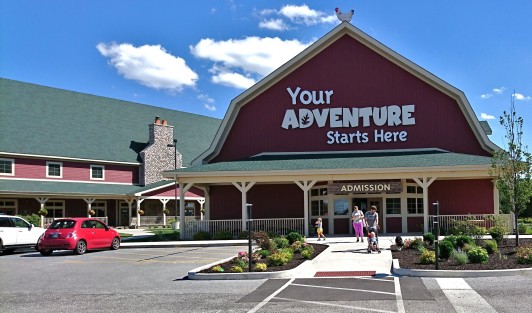
Yesterday, I was pleased to see that more attractions had been added to Fair Oak Farms. I saw at least two new buildings. One was a crop adventure, something right up the alley of our Indiana gardeners. The playground had doubled in size, and a train for the little ones had been added. In addition, they used to have an indoor rock climbing wall, and now they have an outdoor climbing wall. The facility is thriving and is simply getting bigger and bigger, offering more for everyone.

If this all isn’t enough, I heard rumors that Fair Oak Farms is planning to build a resort hotel and a water park in the future. There certainly is enough land to add those and even more. On top of it all, Fair Oak Farms is the producer of power house drinks, Core Power and Fairlife milk, which you may have seen in stores. If you are interested in learning more, check out their website at http://www.fofarms.com. It’s an adventure and learning experience all in one. Check them out!

Hummingbirds in the Garden

DSC_0040

There is nothing like the humming vibration of the little wings of a hummingbird whisking past your head during a hot summer in Indiana. Three types of the little guys are often seen here, the Rufous, Ruby-throated, and Black-chinned hummingbirds. In my garden, I see a Black-chinned hummingbird on a daily basis, and occasionally, a Ruby-throated hummingbird. Since they tend to travel the same path, each day when they feed, I can imagine that the Ruby-throated hummingbird comes more often than I get to see.

It seems like hummingbirds have diminished in the past few years. I put out several types of hummingbird feeders to supplement the plants I grow for them. Soon, I will be finishing a large raised flower bed around the deck in the front of my house and filling it with plants which I know the little hummers love in order to ensure they have all they need in the local area. I want to ensure they come back, every year.

Last year, I had a little surprise. As I was opening one of my hummingbird feeders in order to fill it, one of the little guys sat right on my finger and tried to gather his nectar from the little, red plastic flowers. My heart jumped as I realized that he was not afraid of sitting there. I stood completely still in an attempt to prolong the circumstance. Afterward, the same bird did a little fly-by, stopping to look at me, every day until the last frost. This Spring, when the feeder was empty, a hummingbird which looked exactly the same, flew to the front door and hovered, as if he was looking in the window, trying to find out why I didn’t leave him enough nectar. As you can imagine, I immediately found my stash of feeders (5 of them), cleaned them, filled them, and put them out for my little humming friends to enjoy.

Ketchup and Fries Plant!

DSC_0045

I wanted to share this plant with you. I wanted to try this and will keep you posted on its progress. This is a ketchup and fries plant. It was created by grafting a potato plant on the bottom and a tomato plant on the top. Supposedly (can you hear my skepticism?)… the potatoes are supposed to grow down into the pot and the tomatoes will grow above ground. I am skeptical, because when I grow potatoes, I have to continually pile straw or compost up the stem as they grow up, since potatoes grown on the stems, not the roots. This will be interesting to see for sure… More later!

A Note on Herbs, etc…

After my post, yesterday, I received several emails asking if I grow or use herbs other that oregano. Melinda from Columbus, Indiana wrote that she has a difficult time keeping some herbs alive, year after year. Chris from Greensburg, IN asked which herbs are perennials that can be grown in a flower garden and still look good. While I admit that I am not an expert on herbs, I do have a few opinions and a little experience which may or may not be useful to you. Thanks for asking!

First, I do grow some herbs. My favorites are rosemary, basil, garlic, oregano, lavender, chives, and sage. I also grow thyme, lemon balm, bee balm, cilantro-coriander, horseradish, stevia, peppermint, and spearmint. I use my herbs in several ways, but mainly in cooking and preserving. Lavender is one which I use for many purposes, including crafting, fragrance, cooking, and just looking beautiful in the garden. I do not eat Bee Balm, but it is extremely beautiful, and I use it to attract hummingbirds.

If you do a little research, you will find that many of the herbs we use are members of the mint family, which is an easy-to-grow set of herbs for our part of the country (the USA Midwest), are flavorful, and have wonderful, spicy aromas. Lamiaceae, or mints, are identified by having somewhat square-shaped stems and leaves which hang opposite of each other. Mints are also, generally, very invasive. The mints in my garden include peppermint and spearmint (obviously), oregano, bee balm, lemon balm, agastache (hummingbird mint), basil, rosemary, lavender, and thyme.

So, Chris: Your question is hard to answer, because I do not know your garden. I can say that most herbs like sunny locations and don’t like to become too dry. Oregano, however, thrives in heat and doesn’t seem to be too affected by dry ground, for the most part. If you like a beautiful mounding plant that isn’t too wild looking, you might like lavender or lemon balm. I will warn you, however, lemon balm is very invasive. My friend, Melissa, gave me three little tiny plants, one year, and within a year, it had taken over half of the flower beds with its beautiful green leaves. I have a few chive plants that I use in my flower garden, because they have an interesting look and if left to flower produce a very pretty display of flowers. In addition, if you cut chives to use, it is only a week or two before it looks beautiful, again.

Melinda: I was thinking about your dilemma, and I wonder if you are of the impression that all herbs are perennials. The one I use the most, each year is basil. I use it for my pasta sauces, Italian seasoning mix, bruschetta, pesto, and so many more things, because it has an amazing flavor. Basil is an annual plant in Indiana which you will have to plant, each year. The good thing is that basil can be grow inside or out. It is extremely easy to grow from seed, as well. Cilantro-coriander, parsley, and a few others are also annuals. Also, most herbs do not like shaded areas or areas which get too much water, so perhaps you can look at the location and type of herb you have been trying to grow.

I opened up comments, so you don’t have to email me, if you have questions, but please feel free to if you would like to!  Garden Girl

Mixing Soil for Raised Beds

New Soil

After removing strawberries and an old soil mixture from one bed and needing to upgrade the soil in another bed (yes, there are two which needed maintenance), I thought I would share with you the best soil mixture I have found for raised garden beds. I can not take credit for this. I learned about raised bed gardening from a book written by Mel Bartholomew, from which I learned the benefits of gardening in raised beds versus in the ground gardening which I used to do. years later, Mel wrote a follow-up book called, All New Square Foot Gardening, and now a second edition of that. In the follow-up book, Mel described years of research which culminated in the most wonderful soil to grow plant in. This is the soil mixture that I use in my gardens… with one small addition.

Vermiculite Peat moss

Mel’s soil mixture is so easy to make and so wonderful to use that you will want to use it for most of your raised bed gardens. the recipe is this: Mix together 1/3 compost, 1/3 garden grade vermiculite, and 1/3 peat moss. That’s it! My raised beds are 4 feet wide by 12 feet long  by 8 inches high, and split in two. For each four by six foot section, it takes approximately 3 cubic feet of each to fill the bed. The only exception that I make is that I add a gloved handful of cayenne pepper to my mixture to deter the types of destructive insects that my garden tends to attract.

vermiculite

What I love about this mixture is that it doesn’t compact and become hard, it holds water during Indiana summers, it is easy to weed, and the plants love it. According to Mel Bartholomew, after the very first time you make the soil, when you pull up plants after a harvest, you only have to mix in a little compost and rotate your crops to ensure nutrition and few problems with disease and problem insects. Every couple of years, though, I do add some more peat moss and some vermiculite to keep it light and airy.

Bed w holes

I mix my soil right in the bed, but Mel suggests that you mix it before putting it in the bed. the soil mixture is so easy to use that I don’t have to use tools to do things like dig holes or till the soil. Can you see the holes in the photo above? I made those with my hands with one small scooping motion for each hole before transplanting some tomato plants which I grew from seed. Hopefully, you will have a chance to see them, later in the season… They are supposed to be fantastic 2-pound Roma-style tomatoes called, Big Mamas. I am hoping that this wonderful soil will produce big, yummy sauce tomatoes!

I will keep you posted!

Oregano the Beautiful

oregano

Oregano is a tasty, versatile herb used in many types of cooking. I grow and use the Greek style of oregano, which provides that wonderful smell associated with pizza and the flavors of many Italian, Greek, and French recipes. I like to use it both fresh and dried, but I find that my two plants produce much more than I could possibly use fresh, so I dry a lot of it and freeze a little of it.

Oregano Young Oregano Old

Oregano is an easy-to-grow perennial plant in Indiana. It can be grown from seed, propagated from a cutting, dug up and split into smaller plants, or left to reseed itself. I have found that the best flavor comes from plants which are one to two years old. Once the plant is about four or five years old, it probably should be replaced, because it starts to get woody and lose its flavor. The above left photo is a two-year old plant, and the one on the right is four years old. As you can see, the older the plant gets, the more it spreads. Although oregano is a member of the mint family, it is not as invasive as mint.

Oregano Tools

I usually cut my first harvest of oregano around June 1st, and this year was no exception. I find that using great tools to harvest makes it easier. As you can see, I use a KitchenAid brand harvesting shear. I like that it has a notched area in the blade which assists me with easily cutting things like oregano or asparagus, saving a great deal of time and energy.

Harvest oregano before the plant produces flowers. A plant’s main reason for living is to reproduce, and like humans, once offspring (seeds via flowers) are growing, the plant transfers much of its energy to creating the future baby (seeds). This significantly reduces the amount of herbal oils which are created in the plant, and that relates to less flavor and aroma. I also find that harvesting oregano in early afternoon is best in Spring and early morning is best in Summer allowing for the best flavor.

The first year I grew oregano, I cut the entire stem off, and the plant did not grow back until the next Spring… That was my mistake! I later learned that the best way to harvest oregano is to cut each stem just above at least one set of leaves, leaving part of each stem. That leaves the plant with enough energy-producing leaves to continue to grow. Now, I get multiple harvests from each plant, each season. In 2016, for example, my plants gave me six… YES 6… huge harvests of oregano. I had so much that I gave away 2/3 of what I grew, since I could not use that much herb in three years.

Oregano After

I left about four inches on each stem, during this harvest. As you can see, my beautiful plant is no longer very beautiful. Don’t worry, though, Within a week, it will be visibly growing, again, and the plant will look fantastic in the garden. This harvest was a really large one: I froze some, tied a few bundles and hung them to dry, dried some in the food dehydrator, and left a few stems in the refrigerator to use fresh. Since I make my own pasta and pizza sauces, salsas, and relishes, as well as combine my own dried Italian seasoning mix, I will be using much of my oregano later in the season. You will see it again!